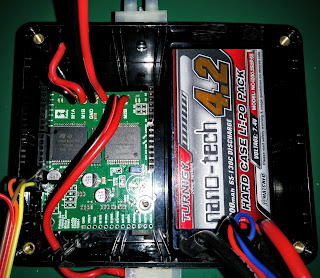
The Mark 1, as I guess I should call it now, had the battery and motor driver haphazardly mounted on top of the robot with wires everywhere. This isn't very pretty, or safe, and didn't leave any room for adding any sensors for the autonomous challenges. To deal with this problem I perused the selection of project boxes available from my local Maplins and selected one that both the motor driver and battery would fit inside.
The project box itself has a removable lid that is held in place by four screws which, with the lid removed, make excellent mounting points. Four quick holes drilled in the chassis and the project box is bolted to the underside of the robot. It fits in nicely between the motors, but does reduces the ground clearance of the robot which may cause problems for the obstacle course.
The finishing touches involved cutting a hole in the side to access the Arduino's USB port, for ease of reprogramming, and cutting another hole in the chassis to pass through the power and I2C connection to the Raspberry Pi. I also decided to switch over to my smaller wheels, mostly to check nothing will end up dragging across the floor.
The Mark 2 feels a lot more solid and robust than the Mark 1 did, with the majority of the robot's top available for installing sensors and any other components that will help in the PiWars challenge. So with some quick changes to the Arduino's source code to support the newer motor driver it was time to go for a test drive.
As I had full control over the motors this time it was a much more successful test run. Compared to my entry from last year Optimus Pi is already much more controllable, due to the lower geared motors and reduced weight, which bodes well for the autonomous challenges this year (I didn't manage to do any of them last time!).
With a working, controllable robot I can now turn my attention back to the software side of things, at least until my next batch of hardware components arrive!
Leo


No comments:
Post a Comment
Note: only a member of this blog may post a comment.